Caleb Cha’s Top Tips for Perfect Milk
Caleb Cha has spent nine years in the specialty coffee industry and in that time he has certainly picked up a great deal of knowledge from his practice, research and experimentation. Caleb specialises in working with milk and pouring creative latte art designs with great precision and skill.
After summarising his enlightening presentation on the science behind milk foam (which you can read here) we’ve put together a list of Caleb Cha’s top tips on milk to help you improve your microfoam!
Getting started
- The focus for baristas is on the fat and proteins contained in milk – proteins casein and whey form stabilising walls around the air introduced to the milk, and fat globules produce a creamy mouthfeel and strengthen the microfoam when heated
- All varieties of milk contain more than enough protein to create voluminous and stable microfoam, however a lower fat content reduces the dense creamy texture, taste and mouthfeel
- Overheating your milk will denature the protein which gives off a sulfur-like smell and taste, the milk will also become extremely thin and unworkable. This occurs at temperatures of 72°C and over
Stretching the perfect jug of milk
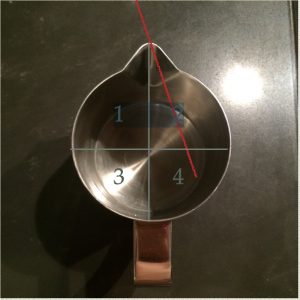
Steam wand position is paramount! Always position the steam wand in the back two quadrants of the milk jug and submerge the tip below the surface – just enough that it won’t continue to stretch when you have the required volume of microfoam.
- The angle of the steam wand should be as horizontal as possible, keeping the steam wand and jets of steam close to the surface of the milk and not pointing towards the bottom of the jug
- When you introduce new air from the steam wand to create foam is very important, always stretch the milk immediately when it is as cold as possible to get the greatest volume of foam
- The golden time for stretching milk is from 0-5 or 6 seconds from when you first turn on the steam wand, the more time for your whirlpool the better!
- In order to get the best possible texture of microfoam, aim to have your milk swirling in a circular motion around the sides of the milk jug, not rolling over like a wave. You are aiming to push your foam through the jets of steam repeatedly to reduce the bubble size and improve the smooth velvety texture of your microfoam. Rolling your milk up and over means your milk is more likely to be thrown randomly in any direction and your foam won’t be as smooth
- Try and have your milk in the circular whirlpool motion for as long as possible! The longer your milk is circling in the jug you will reduce the size of your microfoam and increase the density
Before the pour
- When you’ve finished stretching and heating your milk, tap the milk on the bench firmly just once! Excessive banging and swirling will begin to separate the milk and begin deteriorating some of your microfoam
- Avoid allowing your steamed milk to sit for too long, the liquid will sink to the bottom of the jug and the microfoam will dry out, merging together and dissipating before your very eyes!
These tips should put you in good stead to improve your milk texturing technique and make a noticeable difference in the quality of your latte art and presentation. For a hands-on tutorial, you can join one of our trainers for a 2-hour One-on-one Session or Latte Art Session and allow us to push you further!
Email your contact details and preferred date and time to Luke at info@hgcoffee.com.au or call 7070 2744.


